Wednesday, November 28, 2012

Wooden Pens and Wine Stoppers for the Holidays

These little items add a touch of elegance to our daily routines.

It is that time of year again, so if anyone is interested in pens or wine stoppers as gifts then get your order in soon. I am offering pens made of curly maple (shown below) or cherry with twist mechanism chrome hardware and a Cross ball point refill.  The chrome hardware is seen in the picture with the stopper.  The next shot shows the cherry and maple together.
Below are pictured various stoppers that I have made recently.  Most have a thin dark line that is burned into the stopper as it spins on the lathe.  I have found this to be a nice detail.  If you see any shapes that you would like to order , please let me know.  They are all turned by hand and no two are exactly the same.  The base of the stopper is food grade stainless steel.
Pens and stoppers are priced the same.
$30. for the 1st pen or stopper includes shipping (inside the U.S.).  
Each additional pen or stopper is $25.
Happy beginning of winter.
Tim


Sunday, October 28, 2012

Huntboard with Milk Paint Finish- All Finished and Delivered

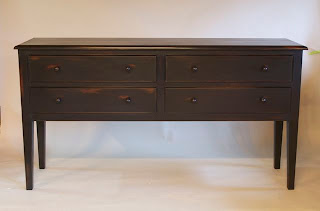
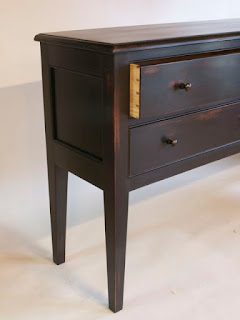
This weekend I just delivered this Huntboard.  Here are a couple shots of it in place in its new home in Virginia as well as a few with a backdrop in my shop.  It looks great in place and is in good company with many other great pieces of furniture, that I did not make, however two of my Waltham Rockers are also there. (see photo below) As I mentioned in my last post, I am very happy with how the construction and the finish on this piece came out.  Upon arriving at their beautiful mountain home, I was treated to a light meal and great conversation by my generous hosts.  Meeting them and seeing where the piece would live, topped off the whole project for me.

If you have not been following this piece, the piece is made of cherry with a thin and worn black milk paint finish sealed with linseed oil, gel varnish and topped off with a coat of wax made of linseed oil and bees wax.  The drawer interiors are pine sealed with a coat of amber shellac and the back is ship-lapped poplar.  The dimensions are 72" wide, 18" deep and 38" tall. Custom sizes are always available. Read my previous postings to learn more about this piece.

cherry huntboard, milk paint finish, hand made by Timothy Clark, Cabinetmaker/Chairwright
cherry huntboard, milk paint finish, hand made cherry huntboard, milk paint finish, hand made by Timothy Clark, Cabinetmaker/Chairwright

cherry huntboard, milk paint finish, hand made by Timothy Clark, Cabinetmaker/Chairwright

cherry huntboard, milk paint finish, hand made by Timothy Clark, Cabinetmaker/Chairwright


 Below are two of my Waltham Rockers which I had made previously for the same clients.
Waltham Rockers made by Timothy Clark, Cabinetmaker/Chairwright


Tuesday, October 23, 2012

Finishing the Huntboard- A dream come true

I had a picture in my mind of what this piece might look like when finished but if you haven't done it before, you don't know if you will achieve exactly what you are trying for.  I feel like I got it on this one.  I wanted to end up with a finish that  has a smooth, worn, warm look.  This is very hard to achieve without years of actual use.  Milk paint helps but it must be sealed with the right stuff and applied in the right way.   Usually , I am very happy to paint a piece but I was a bit worried about this one.  It looked great before painting and the cherry matched nicely so I thought that maybe it would look better without paint.  Well, I am very happy to say that the paint only made it better.  It really brings out the details like the thumbnail edge on the top and beading around the drawers and end panels.    Many would say- "Why use nice cherry if you are going to paint it?"  Well, this is why. There is no way to achieve the warmth that this piece has without the cherry coming through.   The client asked for the piece to be very "worn" looking.  This is why you see areas where the cherry is very visible.  I am very glad that they did.  It makes me want to run my hand over the edges.  If I had the time and space in my house, I would build this piece for myself.

I still need to put one more coat of finish on the top and then a coat of paste wax on the whole thing, but it is already looking great in my opinion.
I will post formal shots when it is all done.

Thanks for looking,
Tim


Monday, October 22, 2012

Huntboard Progress

The following are some of the final steps in the building of this substantial piece of furniture.

The shot below shows the drawer parts after the joints have been cut by hand and before assembly. Lots of sawing and chiseling to get to this point. 

I design the drawers so that the rear of the drawer will fit into the case and the front of the drawer will not quite make it.  The two drawers on the left have been pushed in tightly as far as they will go while the joints dry.  On the right, the drawers have been hand planed until they slide smoothly into the case.


The top of this piece will have a thumbnail detail.  I cut the first part , the step down, with a router. The result is shown below.


The next step is to hand plane the round-over portion of the edge detail.

Below, is the finished thumbnail detail that has also been softened with a hand plane to imitate a worn look.  This piece will have a worn milk paint finish and this worn detail is an important part of that final look.


Below are a few shots of the case with the top set in place and the drawers in place.  The knobs will not be mounted until the drawers are finished.

hand cut dovetails


The next post will include shots of this piece with the milk paint finish.

Other than working on the huntboard, I have been building a set of 10 of my Waltham Arm Chairs and spending time with my kids.  Below, Claire and I enjoy a lunch at a local diner.

Time to cut the grass for the last time this year.
Tim

Wednesday, October 3, 2012

Huntboard or Sideboard?


My current project is this Huntboard. I call it a huntboard because it is made up of drawers suspended on legs and it  has a weightiness and elegance that brings to mind horse country and what goes with it. If you google "Huntboard", you may get varying definitions.

Below is a drawing of the piece and some shots of it going together.
stock is beaded before joints are cut since the bead becomes part of the joint.
I used to think that beading by hand would be too much work but it actually going quite fast and you have more control than using a router.  You are out of luck if a router decides to tear a chunk out of your piece of wood that you have spent so much time on making sure that it is straight and true.  Also, you can change blades to get many more bead sizes than you can with a router.  This Lie Nielson beading tool is great. Solid bronze and very smooth working.  Not cheap, but worth it.
this shows the bead continuing around the corners and also shows the pegged tenons.

seats for mortices are set into the legs the depth of the bead so that the bead can continue around the corners.


Below, are the legs and panels which are painted before assembly.  This piece will be painted with black milk paint which will be worn to create a warm look with the cherry highlights coming through.


I am now working on the drawers and top.  Gotta get back to work.  I need to deliver this piece before the end of the month.

Enjoy the rain. We really needed it.

Tim

Thursday, September 20, 2012

Waltham Windsor Chairs; Laminating Rails

I am currently working on a set of 10 Waltham Chairs for a customer in Texas.  There are 8 of my regular Waltham Arm chairs and 2 of my Tall Waltham Arm chairs.
The rails of the chairs are laminated from cherry veneers. Below is a picture that shows a stack of veneers, a rough glued arm rail and the mold that it is glued on, as well as a rail that is all shaped and ready for sanding.


A freshly glued arm rail lamination still in the clamps.

Arm spindles are brought to zero moisture content under the heat of 100watt bulbs.  I leave them under the light for  about 1/2 at minimum.
5 of the order of 10 chairs that I am working on now.
Now that the chairs are all built, I am working with the client to finalize the color that they will be painted with milk paint.  I need to do more samples of different mixtures of colors to get just the right gray.  You can't take a Benjamin Moore color chip to the paint store to get a matching milk paint color. Some colors, like this one will take some trial and error. So far, just error.
I will keep you posted in the color progress.

Enjoy the crisp weather,
Tim


Below is a shot of Claire's and my latest sailing trip to a near by beach.  Usually we can sail up to the bottom edge of the photo. The boat is grounded in about 12" of water now. (not the green canoe) The level of Lake Champlain is very low. I do not think that I have seen it so low.


Tuesday, July 10, 2012

Cherry Side by Side Dresser #2, and Remembering #1

The last time that I made this dresser was 1999.  I received a deposit for the dresser and a wardrobe and purchased all of the needed lumber for the project in September, 1998.   I happened to also be closing up my rented shop at the time, put all into storage, and began to build my house on land that we had purchased.  The following March, I had completed the house enough to live in and to have my workshop in the downstairs.  During the building process, I had lived on the remaining portion of the deposit.  Once the shop was workable,  I built the dresser and wardrobe in the new space.  Everything worked out nicely and since then, I have built a separate shop and one day I will even finish trimming out the house.   

During the building of this second piece, things were not so dramatic.  Just driving kids to and from school, daycare, soccer and music lessons.

A piece of this size is always a big project. When I started this one, I was happy that I had already built the piece before.  The first time through, I had figured out how to build such a large case piece while making it strong enough to be rigid under it's own weight.  This piece is very stiff and strong. I can sleep at night when I think about how it is built.  When many months are invested in a piece, you need to be confident that it is done right or the worry will wear you down.

Lots of hand cut dovetails on this piece.
                                   

Even having made many case pieces over the years,  I am always trying to make things the best that I can.  Before finishing the inside of the piece and the drawers, I consulted my peers in the Guild of Vermont Furniture Makers via email.  I asked what others felt was the best way to treat the drawers so that they slide their best.  There were many responses, mostly including, paraffin, raw or shellac interiors.  I finally decided on a single wash coat of shellac on the inside of the drawer to make it easier to clean.  I did the same to the outside of the drawer to give it a dry slippery feeling and then rubbed on paraffin from a block onto all bearing surfaces on the drawer and inside the case which remains unfinished. The shellac has a bit of a sweet fresh smell and the paraffin has no smell.  I am very happy with the results.  I recommend that everyone have a block of paraffin around the house as it will make any wood on wood drawer slide easier without the smell of solvents that you get with most paste waxes.
drawers with poplar sides and back, pine bottoms

drawers are made from one piece of wood across the face of the chest

face frames are dovetailed 


The back is ship lapped poplar with hand holds cut into the back just under a drawer  frame.  You push the drawer out a bit and grab above the drawer in the front of the dresser with the other hand.  This piece can be scooted around with two strong people in this way. For actual moving, I recommend taking all of the drawers out. This takes a lot of weight out.
The outside of this piece is finished with a linseed oil based danish oil and given a coat of paste wax.  It is brand new in these photos and will darken down quite a bit after a few months.

Enjoy the cooler weather. Water the garden. Go sailing.
My 5 year old is learning to steer our daysailer and our 11 year old is off living in a Tee Pee for three weeks.  Yesterday from the breakfast table we watched a young bunny in the yard running in circles in the fresh dirt around a newly planted rhubarb plant.  It would circle 3 or 4 times, stop and then do it again.  Very entertaining.  And no, he did not appear to eating the leaves.

The trim on the house will have to wait.  Enjoy the summer.


Tim